Table of Content
- 1. Introduction
- 2. Download
- 3. Features of RadioPi
- 4. Preparation before use
- 5. Networking for RadioPi
- 6. Find RadioPi in the LAN
- 7. Remote Control RadioPi
- 8. Advanced guide: RadioPi for field operation
- 9. About RadioPi’s audio
- 10. Safety tips
- 11. Popularity Contest
- 12. Agreement
RadioPi User Guide
- Version: 2020-08-01
- by BG6LH, BG1TPT, BI1EIH
1. Introduction
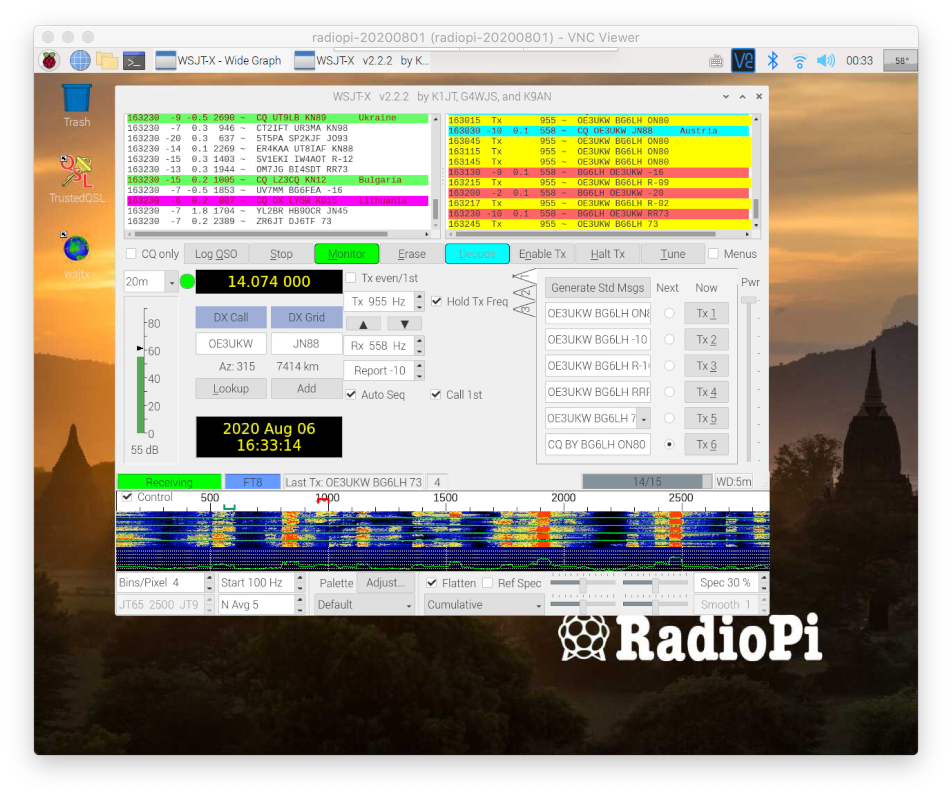
RadioPi is a Hamradio Raspberry Pi OS image. It’s optimized for remote control and field operation. You can flash it into a SD card, and run it on a RPi computer directly.
(For the convenience of expression, we will refer to the RPi computer running RadioPi image as “RadioPi” in short.)
RadioPi can help to:
- Control your rig, run FT8, log QSO, and upload to LoTW.
- Control your rig at home, when you take a walk in a park.
- Go to field without your laptop computer.
- Discover QSO by SDR and amateur satellites.
- Rapid Deployment, Plug & Play.
2. Download
- Image file: image_2020-08-01-radiopi.zip
- Size: 1.26GB
- SHA-256: d949ed21097864aaa6bed4d453d22415e5a25e2479fd835f8398e9dbc0fd6ec4
For users from China Mainland could dowload it from pan.baidu.com, also:
- https://pan.baidu.com/s/1RdeLioiFB9-eHlj42UE-GA
- ExtractCode:5v9r
- Size: 1.26GB
- SHA-256:d949ed21097864aaa6bed4d453d22415e5a25e2479fd835f8398e9dbc0fd6ec4
3. Features of RadioPi
The RadioPi image is a redistribution based on the Raspberry Pi OS. We try to make it as clean as the official image.
3.1 Features
- Default user: pi
Password: radiopi599 - Setting Locale to en_US.UTF8. Chinese Language also is supported. fcitx fcitx-googlepinyin input method are installed
- chornyd and gpsd for timing service
- non-ham softwares are removed。the zipped distro IMG is only 1.28GB
- Gnuradio and SDR libs are installed, such as hackrf, gr-osmosdr and so on. it is ready for more fun of SDR testings
- SSH, VNC, Avahi services are enabled for field operation
- A hotspot “radiopi” is installed for field operation
- A 1280x1024@60Hz screen resolution is installed. it’s better for iPad’s VNC to remote control RadioPi.
3.2 Softwares on RadioPi
| Application | Version | Description |
|---|---|---|
| WSJT-X | 2.2.2 | The extreme weak-signal communication software |
| JTDX | 2.1.0-RC150 | More features than WSJT-X |
| TQSL | 2.4.3 | The ARRL LoTW QSL client |
| Xlog | 2.0.14 | A light weight logging program |
| Fldigi | 4.1.01 | Amateur Radio in Digital Modes |
| CHIRP | daily20190104 | Programming amateur radios, supporting a large number of manufacturers and models, such as Yaesu, Icom, Kenwood, Baofeng, TYT and so on. |
| QSSTV | 9.2.6 | Receiving and transmitting SSTV and HAMDRM(DSSTV) |
| GNU Radio Companion | 3.7.13.4 | GNU Radio is a free & open-source software development toolkit that provides signal processing blocks to implement software radios. |
| GQRX | 2.11.5 | Gqrx is an open source software defined radio receiver (SDR) powered by the GNU Radio and the Qt graphical toolkit. |
| CubicSDR | 0.2.5 | Cross-platform SDR application |
| Direwolf | 1.4 | A software “soundcard” modem/TNC and APRS en/decoder |
| Gpredict | 2.3-33-gca42d22-1 | A real-time satellite tracking and orbit prediction application |
| VNC Server | 6.7.2 | To remote control your rig remotely by VNC |
| PulseAudio Preferences | 1.1 | For simultaneous line-output, and transmit monitoring. |
You need to complete some the power-on settings by yourself, such as the connection with your rig, call sign and LoTW account and so on. We hope that RadioPi can meet Ham’s requirement as stable as possible, so some software is up to date, some are stable. You are welcome to recommend better software, we will pre-install it in future radiopi versions.
3.3 Default username and password of RadioPi
- username: pi
- password: radiopi599
Those are username and passwords login to SSH, VNC, or desktop.
3.4 Default host name of RadioPi
- hostname: radiopi
RadioPi is configured with the Avahi service that automatically broadcasts hostnames in LAN networking. You can find your RadioPi by directly accessing radiopi.local on other devices that support the mDNS protocol.
RadioPi is configured to automatically login to the desktop after booting, which is an optimization for VNC remote control. After your first login, it is recommended that you change the password of user pi.
4. Preparation before use
Before using RadioPi, you need to do some preparations:
4.1 microSD cards
- MicroSD cards, also called TF cards, mobile phone memory cards, recommend high-speed cards at least 8 GB.
- USB TF card reader, or TF to SD convertor, for writing cards.
4.2 Card writing softwares
- On Windows, Win32DiskImager is recommended.
- On MacOS, balenaEtcher is recommended.
4.3 Raspberry Pi
- Pi 4 model B is recommended, at least 2G memory version.
- If your Raspberry Pi does not have a Wi-Fi network, it is recommended to buy a USB Wi-Fi dongle.
- You can also prepare a USB GPS dongle to get more accurate time. This requires a little extra configuration on radiopi.
4.4 Other preparations
-
In addition, depending on your rig, you may also need a USB sound card dongle, a USB to RS232 or TTL convertor, and so on. For example, YAESU FT-817 may need those perpherals. However, ICOM IC-7300 does not need them. It connect to RadioPi directly with its USB cable.
-
The monitor, keyboard, and mouse.
You can also use the RadioPi in “headless”, without using a monitor, keyboard and mouse. RadioPi has been configured with SSH, VNC, Avahi services, and is optimized for remote control. This is the point of playing the Raspberry Pi. For this part, please refer to the Part 7: “Remote Control RadioPi”.
5. Networking for RadioPi
5.1 Wired LAN
This is the simplest way: connect the RadioPi to your home router with a cable wire.
5.2 Wi-Fi Network
On the RadioPi screen, click the Wi-Fi icon in the upper-right corner to add a wireless network. This is as simple as a normal computer.
5.3 A Pre-saved Wi-Fi network
For field operation with a “headless” RadioPi , we have pre-saved a Wi-Fi network, named “radiopi”, in it. When you share a Wi-Fi hotspot named “radiopi” on your phone, the RadioPi will automatically connect it after power on. Details of this Wi-Fi network:
- ssid: radiopi
- psk: radiopi599
- key_mgmt: WPA-PSK
On iPhone and iPad, the name of the shared hotspot is its hostname. You need to change it to radiopi in “Settings/General/About/Name”.
5.4 Setting up wireless networking Manually
One more technical way is writting a Wi-Fi configuration file on the RadioPi’s boot folder:
- File name: wpa_supplicant.conf
- Format: txt
In this file, you can write multiple Wi-Fi networks. You will need to create a text file named wpa_supplicant.conf, paste the following codes, change it by your information:
country=CN
ctrl_interface=DIR=/var/run/wpa_supplicant GROUP=netdev
update_config=1

network={
ssid="radiopi"
psk="radiopi599"
}

network={
ssid="<Name of your home wireless LAN>"
psk="<Wi-Fi password>"
}

network={
ssid="<Name of your office wireless LAN>"
psk="<Wi-Fi password>"
}
Then:
- Putting your RadioPi SD card back to computer, there will be a new drive named “boot”, it is RadioPi’s boot folder.
- Copying the
wpa_supplicant.confto drive boot’s root directory. - Ejecting you SD card, and putting it into the Raspberry Pi.
After the Raspberry Pi is started, this file will automatically update the RadioPi’s Wi-Fi settings.
We recommend you to keep a Wi-Fi network of your mobile phone’s shared hotspot, for your future field operations.
6. Find RadioPi in the LAN
If you want to control your RadioPi on balcony from your kitchen or bathroom, you need to find the RadioPi’s LAN IP address first. Here are three ways to find RadioPi on a LAN.
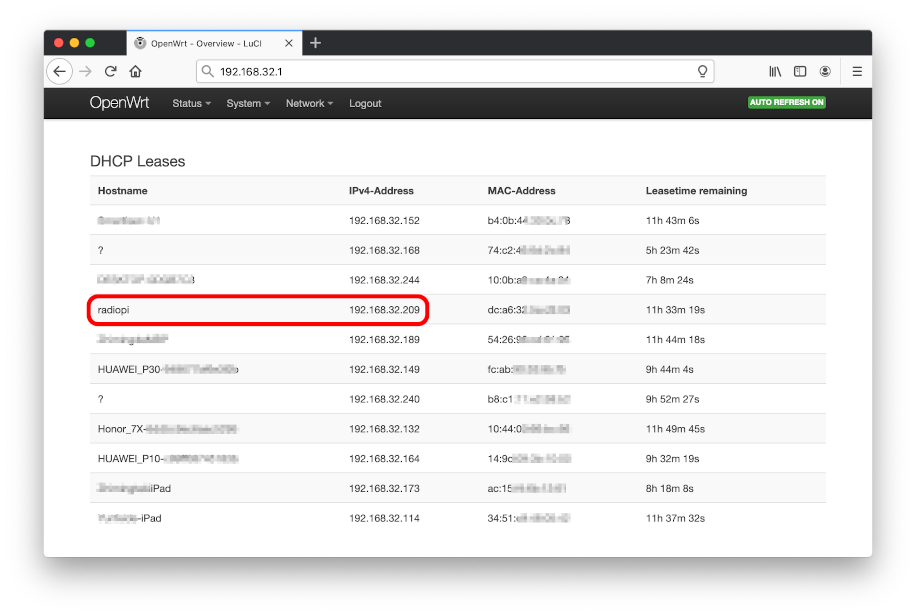
6.1 Find RadioPi on the router
The simplest way is to login to your router, and find the list of devices. RadioPi’s default hostname is “radiopi”. You can figure out which IP address is assigned to “radiopi”.
6.2 Scan IP address
You can also use the IP scanning tool to figure out the radiopi’s IP address in your LAN. The software recommended is: IP Angry Scanner, which scans your entire LAN of your computer and lists the results.
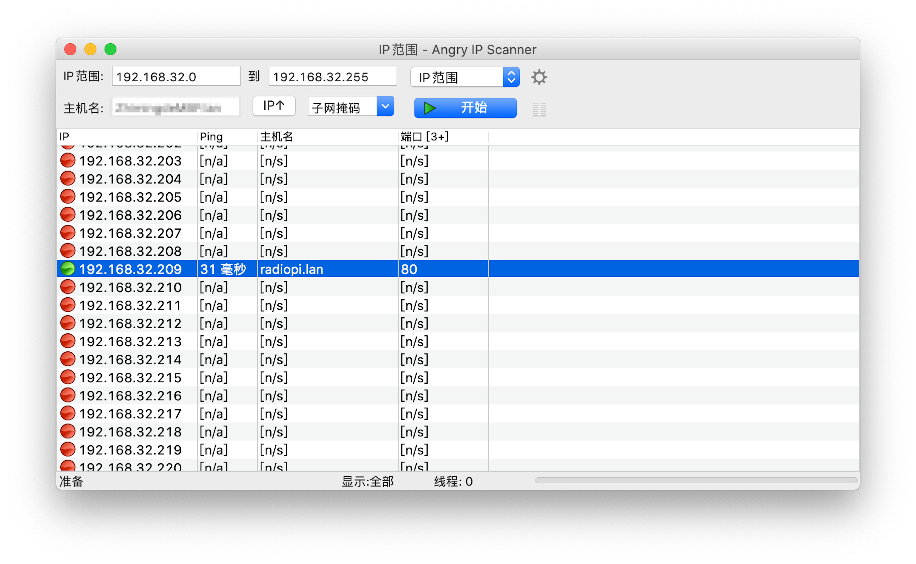
It figures out the IP address of RadioPi is 192.168.32.209.
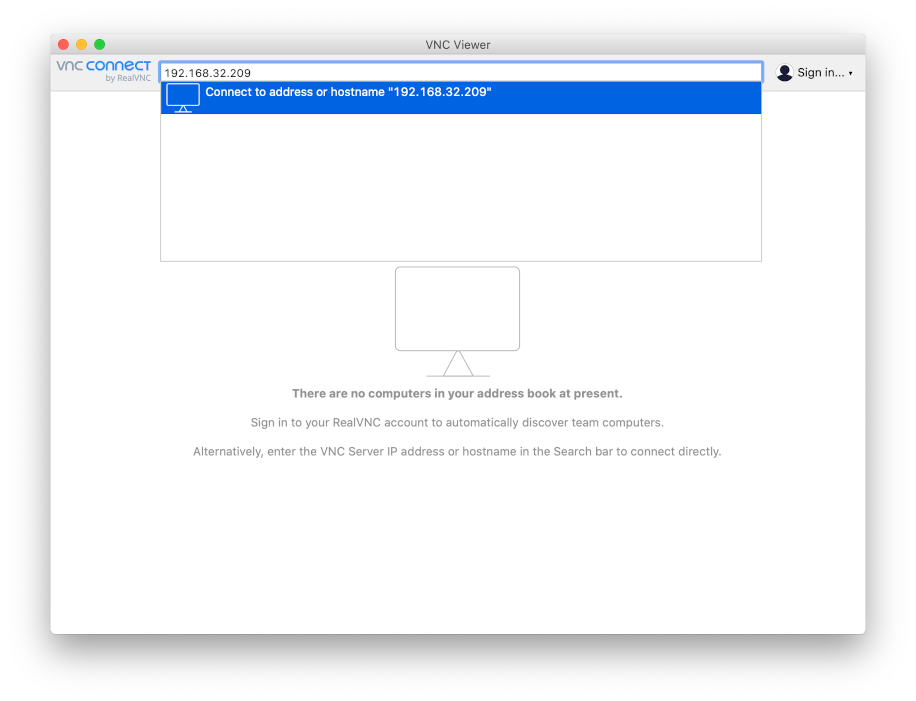
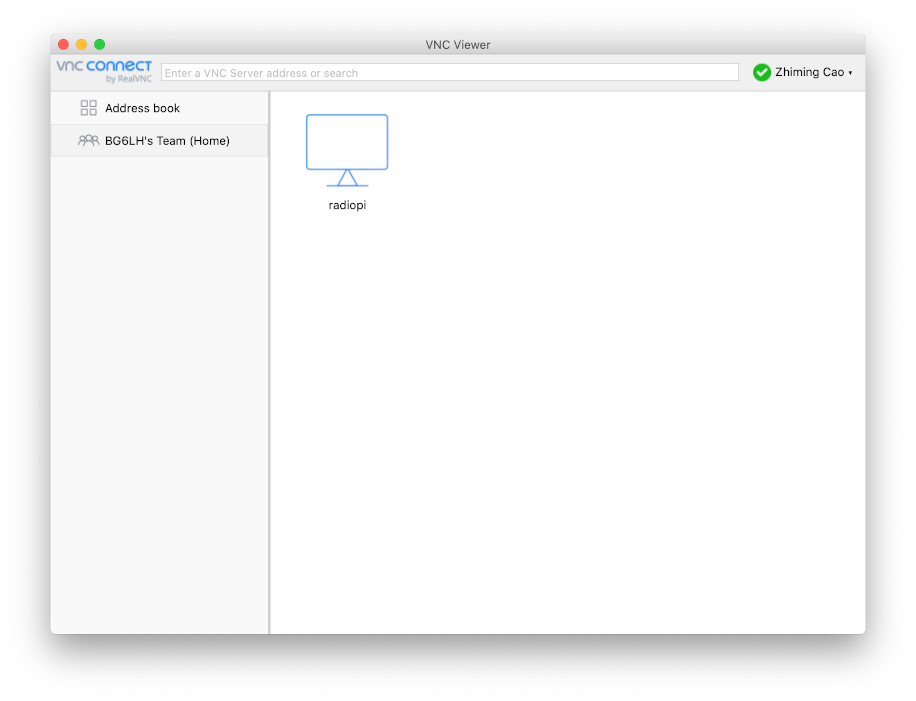
6.3 Access radiopi.local directly
On devices that support mDNS, such as Apple’s Macbook, iPhones and iPads, you can directly access RadioPi using the URL radiopi.local.
We configured Avahi service that supports mDNS (multicast DNS) protocol on RadioPi. In short, when RadioPi is connected to network, Avahi broadcasts its hostname on the LAN. RadioPi’s default host name is lowercase “radiopi”, so its local URL is: radiopi.local.
The following figure shows VNC Viewer as an example. You can enter radiopi.local directly in the address bar to access your RadioPi.

| mDNS service on different operating systems |
|---|
| Unfortunately, mDNS service is not a standard service for all operating systems. Use Bonjour on an Apple’s devices There is the Bonjour service on Apple’s devices, which, like Avahi, supports the mDNS protocol. So Apple devices can directly access radiopi.local. Use Bonjour service on Windows In Microsoft’s Windows, there is no Avahi or Bonjour by default. However, You can install Apple’s Bonjour Print Service. That will help to enable mDNS of your computer. The Download address of Bonjour Print Service for Windows is here: https://support.apple.com/kb/DL999. Use avahi service on linux system On various Linux systems, like the Raspberry Pi OS, the avahi-daemon service which supports mDNS should be installed. On an Android phone… Android phones do not provide mDNS services in user’s operating level. So you need to find it on your router or scan your LAN to get the radiopi IP address. In addition, RealVNC provides a “cloud connection” to access RadioPi. After some settings, finding RadioPi’s IP address can be simplified. That will be introduced later. |
7. Remote Control RadioPi
7.1 How to remote control
Connecting the RadioPi and your rig, and using the remote desktop sharing system such as VNC to control the RadioPi, from another computer or mobile phone. That’s we called “remote control”.
There are two sences of remote control:
- Remote control via home LAN: For example, controlling your RadioPi on balcony from your kitchen or bathroom.
- Remote control via Internet: Controlling your RadioPi at home, from a park, or another city, which needs to be conneted to Internet, both your RadioPi and your accessing devices.
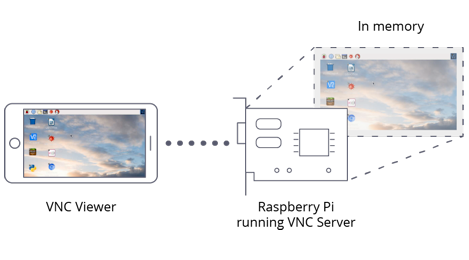
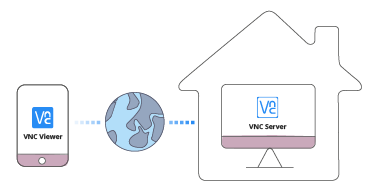
7.2 VNC (Virtual Network Computing)
VNC is a graphical desktop sharing system that allows you to remotely control the desktop interface of one computer (running VNC Server) from another computer or mobile device (running VNC Viewer). VNC Viewer transmits the keyboard and either mouse or touch events to VNC Server, and receives updates to the screen in return.
We have configured VNC Server and related services on RadioPi. Next, you need to install VNC Viewer on another computer or mobile phone.
7.2.1 Download VNC Viewer:
- https://www.realvnc.com/en/connect/download/viewer/
- For Android’s users, also can download the .apk package from RealVNC.
7.3 Remote Control RadioPi via LAN
In the address bar of VNC Viewer, enter the IP address of RadioPi.
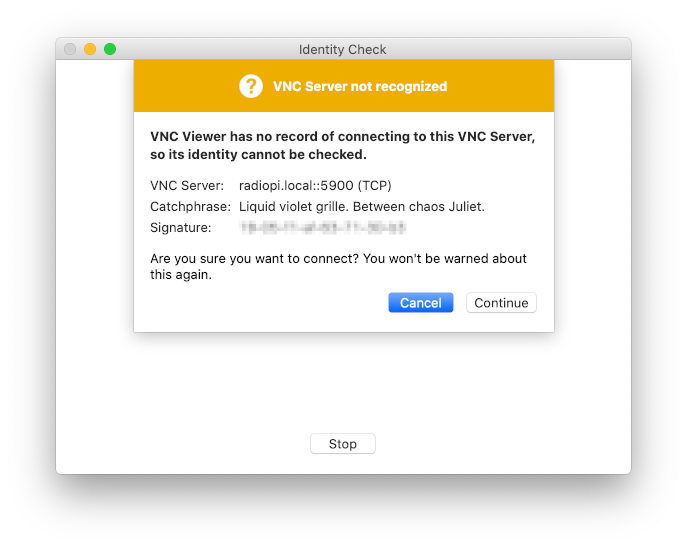
When you are connecting RadioPi for the first time, VNC Viewer will give a security prompt. Clicking Continue.
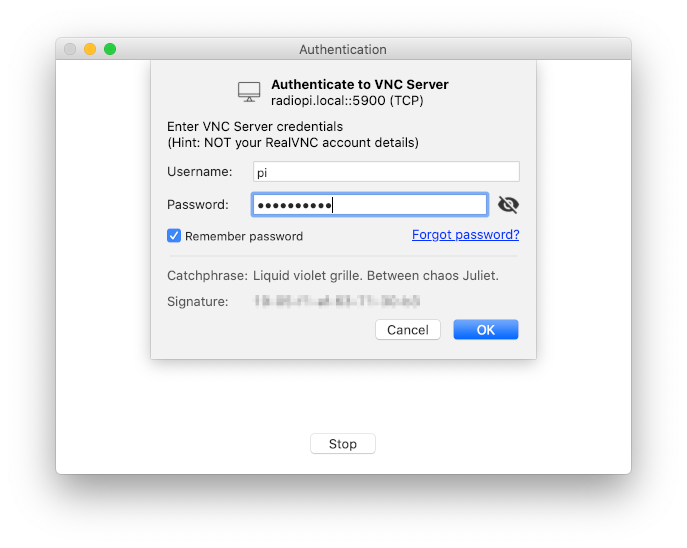
Next, you need to enter the user name and password for logging in to RadioPi. The default are:
- username:pi
- password:radiopi599
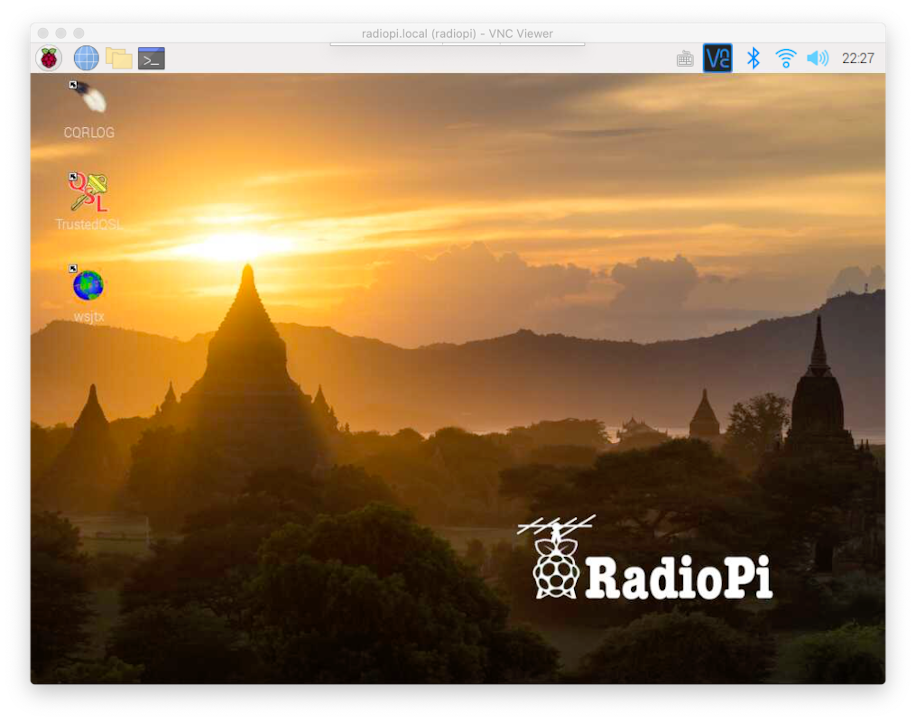
Then you will see the RadioPi desktop in the VNC Viewer window. You can operate it like an ordinary computer. At this point, you have controlled the RadioPi on LAN.
7.4 Remote Control RadioPi via internet
If you want to control the RadioPi at home when you are woalking in a park, you need to register RealVNC’s “Cloud Connection” service.
Before going to the park, you need to complete the following steps :
- Visiting the website https://manage.realvnc.com to register a RealVNC account.
- Login to RadioPi’s VNC Server, by this account.
- Login to VNC Viewer on your mobile phone, by this account.
When each device logged in for the first time, RealVNC will require a verification by email. After the verification, the remote RadioPi will appear in the address book of VNC Viewer. You can just click it directly when you access it next time.
8. Advanced guide: RadioPi for field operation
Finally, it comes to field operation.
A headless RadioPi could replace a laptop totaly. You still have to rely on VNC, which means you have to let RadioPi to connet to Internet.
The best way to getting internet connection in the field is sharing a hotspot on you mobile phone. So we pre-saved a wireless network connection called “radiopi” in RadioPi:
- ssid: radiopi
- psk: radiopi599
- key_mgmt:WPA-PSK
When you are sharing a Wi-Fi hotspot named “radiopi” on your phone, setting the password to “radiopi599”, and encryption method to “WPA-PSK”, the RadioPi will automatically connect it after power on.
On iPhone and iPad, the name of the shared hotspot is its hostname. You need to change it to radiopi in “Settings/General/About/Name”.
After RadioPi is connected to the Internet:
- iPhone and iPad users can access VNC Viewer by the hostname “radiopi.local” directly.
- Android phone users can access RadioPi in the “Cloud Connection” address book.

9. About RadioPi’s audio
9.1 Audio-In
As you know, Raspberry Pi does not have any audio-in or line-in hardware. To working with radios without sound card, such as FT-817, you should connect it to a USB sound card, or a USB-CAT interface device. The radio sent audio signal from those perpherals to RadioPi. Then, the softwares on RadioPi decode the signal to human readable information. When the software transmit signal, the encoded audio is sent to your radio from those perpherals.
9.2 Audio-Out
By default, Raspberry Pi’s audio-out devices are independent of each other. If you are using a USB sound card to transmit audio, you may not hear this sound from the 3.5mm audio jack, or HDMI output. However, we’d installed PulseAudio Preferences. It could help to make all sound output devices simultaneously.
- Click the RadioPi’s Applications Menu/Preferences/PulseAudio Preferences.
- Open the fourth tab: Simultaneous Output.
- Check the “Add virtual output device for simultaneous output on all local sound cards”.
- Restart your software such as WSJT-X, choose the audio output to “combined”
10. Safety tips
- Most of the applications on RadioPi are based on “Hamlib”. Which has been developed for two decades. It is successful and stable. But these applications are still being updated. So no one guarantees they will work perfectly with every application and every rig.
- The hardware of Raspberry Pi is not designed for RF conditions specifically. So using the Raspberry Pi to control radio devices has certain risks. When you use it to work with a high-power, or unbalanced antenna and feedline, the poor SWR, poor balance, insufficient counterpoise can all cause RFI to your Raspberry Pi, your rigs and peripherals.
- The radio devices we have tested are limited, mainly including FT-817/818, IC-7000/7300, D4D kit, etc. The antennas we used are end-feeding, random long wires, PAC12, G5RV jr, and even small magnetic loop. The above experiences happened during Both the QRO and QRP operations.
- Therefore, it is very necessary to treat those issues seriously. Especially when you are operating an remote radio devices.
- Solving these problems is also one of the fun of hamradio.
11. Popularity Contest
We Hope to know which packages are used commonly on RadioPi. So we installed Debian Popcon (Popularity Contest) package by default. The Popcon package submits the softwares information on RadioPi to the central server of Popcon project, once per week, dose not contain any user’s privacy. You can also find the result by visiting https://popcon.debian.org. You can decide to quit popcon project, by using the following command: sudo dpkg-reconfigure popularity-contest and type No.
12. Agreement
- Downloading and using the RadioPi image means that you have agreed to take the risks and responsibilities of using it by yourself.
- RadioPi is released under a Creative Commons CC BY-SA (Attribution-ShareAlike 4.0) license.